Using Caddy for automatic SSL certificates with Cloudflare
Cloudflare has been a blessing and a curse when it comes to taking care of SSL certificates for your websites and web applications. Cloudflare does most of the heavy lifting and makes sure you're protected from attacks. However, it's also a curse. Let me explain!
Why Cloudflare and generating SSL certificates are a challenge
Cloudflare serves as a proxy between the internet and your webserver. This is great because they can filter suspicious behavior and protect your web server from attacks. The attacker will never be able to determine the IP address of your server, because this is hidden by Cloudflare.
However, this is also a problem. When generating SSL certificates, the provider needs to be able to verify that the requesting server is actually who they say they are. Certbot for example, will need an external server to reach your server to verify that the domain name points to the requesting server. Only then if it can verify this, will it generate an SSL certificate for that domain.
The problem is that you still have Cloudflare in the middle of this interaction. The request from the external server will never reach your web server, so it can't verify the domain name points to your server. You can circumvent this by temporarily turning off the Cloudflare proxy and performing this check, but now you're not protected. And what happens when it's time to renew your certificate? Will you temporarily disable the Cloudflare proxy every time? I don't think so.
How does Caddy generate SSL certificates behind Cloudflare?
So I hear you asking: "Even if you use Caddy to automatically generate these SSL certificates, you'll run into the same problems". And you would be right. However, Caddy has a very nice plugin you can install that interacts with the Cloudflare API to solve DNS challenges for LetsEncrypt.
The benefits of these are fantastic because you get:
- HTTPS between your server and Cloudflare AND HTTPS between Cloudflare and your visitors.
- Zero, yes truly Zero, maintenance when it comes to SSL certificates. Caddy will automatically generate new certificates and you won't have to mess with Cloudflare, ever.
If Caddy itself didn't make you excited about web servers, the thought of zero maintenance and no messing around with Cloudflare will. Let's look at how we can integrate this.
How to integrate the Cloudflare DNS module in Caddy with Docker
The docker part of this integration is optional, but I prefer to run all of my applications in containers, including my Caddy installation. So you can follow that part or skip over it, your choice.
First, we'll need to use caddyserver/xcaddy to build a custom binary for Caddy. Caddy is written in Go, so we'll need to compile our binary to include the Cloudflare plugin.
You can do so by using this command:
$ xcaddy build \
    --with github.com/caddy-dns/cloudflare
This command will create a binary that includes the base Caddy installation and add the Cloudflare DNS module. In a multi-stage docker image this will look like this:
FROM caddy:2.6.1-builder AS caddy-builder

RUN xcaddy build \
    --with github.com/caddy-dns/cloudflare

FROM caddy:2.6.1-alpine

COPY --from=caddy-builder /usr/bin/caddy /usr/bin/caddy
The reason I'm putting this in a multi-stage docker image, rather than exposing it in 1 stage is the final image size. The caddy builder image is quite large, as it includes all the development software. You won't need any of this in production. All you'll need is the resulting Go binary at /usr/bin/caddy.
One of the downsides is that building your custom Caddy binary isn't the quickest process. Luckily, you won't have to do this very often, so it's a great idea to publish your own Caddy base image (the Dockerfile above) and include that when you're building your final application.
As an example of this, I'll create a base image from the Dockerfile above and call this: roelofjanelsinga/caddy-cloudflare
I can now use this for hosting my web app like so:
FROM php:8.1-cli AS build-env
COPY --chown=www:www . /var/www/html
WORKDIR /var/www/html

# Perform some other build steps, like "npm run build" and "composer install"

FROM roelofjanelsinga/caddy-cloudflare:latest

COPY --from=build-env /var/www/html /var/www/html
COPY ./docker/caddy/Caddyfile /etc/caddy/Caddyfile
Again, this is a multi-stage build to have the smallest final image as possible. In the second step, I'm using the custom Caddy base image, I'm copying my project files from the build step into the final image, and I'm including a custom Caddyfile with my domain configuration. This image can be served and will automatically take care of SSL.
Getting the Cloudflare API Token
In the custom Caddyfile, we'll need to add an entry to tell Caddy we want to use Cloudflare for our DNS challenges. Let me give you an example of my configuration first:
https://mydomain.com {

    root * /var/www/html/public
    encode zstd gzip
    file_server

    tls {
        dns cloudflare {env.CF_API_TOKEN}
        resolvers 1.1.1.1
    }

}
Keep in mind, that this is a barebones, non-production configuration. It's just here to illustrate how to make this process work.
In the TLS configuration, we've noted that Cloudflare should be used for DNS challenges and you're seeing an environment variable for a Cloudflare API token.
Let's see how to get that token:
- Log in to Cloudflare and go to the domain you want to enable Caddy for.
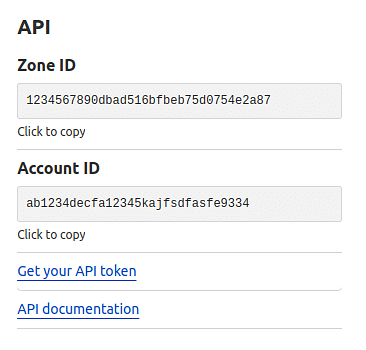
- On the right, you'll see a section with the "API" header. Click "Get your API token":
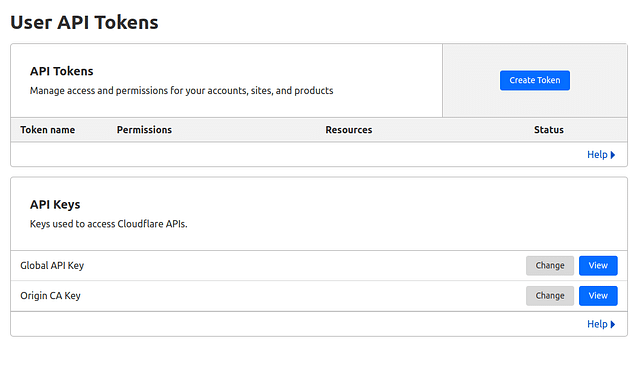
- Under the API tokens block, click "Create Token":
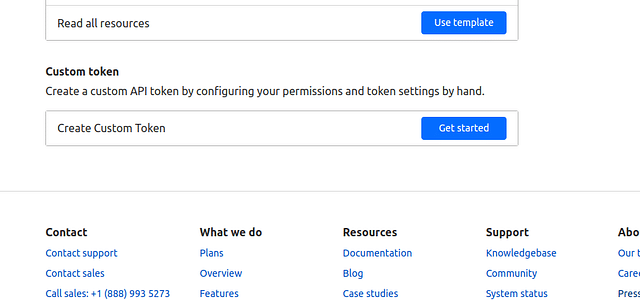
- On the "User API Tokens" page, scroll to the bottom and press "Get started" in the Create Custom Token section:
- Give your token a descriptive name, and add 2 permissions:
- Zone - Zone - Read
- Zone - DNS - Edit
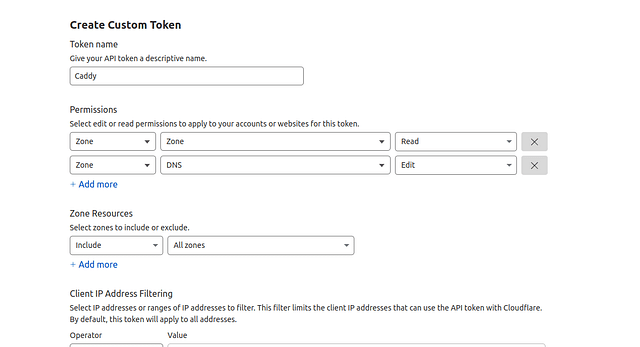
- Click "Continue to summary" and you should now see your API token.
Using the Cloudflare API Token with Caddy
Now that you have the API token, the easiest way to use this is by including it in your docker-compose settings:
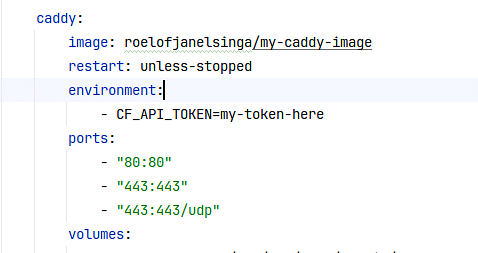
But you can supply this environment key in any way that works for you. Now, after you start your caddy container, you'll notice that it's instantly trying (and succeeding) to perform DNS challenges through Cloudflare and generate SSL certificates for your application.
You'll now have automatic SSL certificates as long as you use Caddy and you'll never have to mess with Cloudflare again. Pretty easy, right?
Posted on: September 23rd, 2023I streamline your business with software that actually fits the way you work.
Ready to streamline your business? Let’s chat.
