SEO and personal marketing for developers
In January of 2019, I stopped posting my blog posts on Medium and started to post them on my own website. This was primarily because I like to own my own content and be in control over every aspect of it. Moving away from Medium meant that I lost the vast audience of the Medium platform, so I had to capture this attention myself if I want my posts to be read. Here's what I've done to accomplish this.
- Set up the basic meta tags for Google and social media platforms
- Create a sitemap of all your blog posts
- Sign up for the Google Search Console and Google Analytics
- Create an RSS or Atom feed to allow your readers to subscribe to your post updates
- Build a mailing list to share your blog posts
- Share your blog posts on social media
Set up the basic meta tags for Google and social media platforms
If you want your content to show up in the best way possible, you will have to set up all your meta tags correctly. This means including meta tags for Google, Facebook, Twitter, and other platforms that you may be using or marketing to. You can find the tags I'm using by checking the page source, but for those of you on a mobile phone, here's a snippet of it for my last post:
<meta name="keywords" content="How,I,reduced,my,docker,image,by,55%">
<meta name="description" content="This is where your description goes">
<meta name="author" content="Roelof Jan Elsinga">

<link rel="author" href="https://plus.google.com/u/0/+RoelofJanElsinga"/>

<meta property="og:title" content="How I reduced my docker image by 55% - Roelof Jan Elsinga"/>
<meta property="og:type" content="website"/>
<meta property="og:image" content="https://roelofjanelsinga.com/images/articles/steel_tower.jpeg"/>
<meta property="og:url" content="https://roelofjanelsinga.com/articles/how-i-reduced-my-docker-image-by-55-percent"/>
<meta property="og:description" content="This is where your description goes"/>

<meta name="twitter:card" content="summary_large_image">
<meta name="twitter:url" content="https://roelofjanelsinga.com/articles/how-i-reduced-my-docker-image-by-55-percent">
<meta name="twitter:title" content="How I reduced my docker image by 55% - Roelof Jan Elsinga">
<meta name="twitter:description" content="This is where your description goes">
<meta name="twitter:image" content="https://roelofjanelsinga.com/images/articles/steel_tower.jpeg">

<title>How I reduced my docker image by 55% - Roelof Jan Elsinga</title>
As you can see, there aren't a lot of different types of information you need, it's just a matter of finding the right tag name.
Create a sitemap of all your blog posts
You want to make it as easy as possible for Google to find your blog posts. A great way to do this is to make a sitemap and submit this to the Google Search Console. In the next section, I'll explain how you can do this. An example of a sitemap for your posts can be found on my website, have a look at my sitemap and you'll find that all my blog posts, including this one, has been entered into it.
Sign up for the Google Search Console and Google Analytics
The sitemap you created in the last section needs to be submitted to Google, so let's get started with this. First, sign up for Google Analytics and add the verification HTML file they provide you with to your website. The steps in this process are well explained, so I won't go into it here.
When you've signed up for Google Analytics, you should sign up for Google Search Console. Google Analytics is used to track your page views and different user behaviors, while Google Search Console allows you to submit new pages to the Google index, it'll give you insights on how people find your website and a lot of other useful things for promoting your website. If you're having trouble in this process, this post by Yoast should help you "How to add your website to Google Search Console".
Create an RSS or Atom feed to allow your readers to subscribe to your post updates
Your readers most likely won't be checking your website every single day to check if there is a new blog post. A lot of other tech blogs I follow actually let you know when there is a new post, through an RSS feed. Setting one up allows your readers to be notified when you post a new post, that's free marketing for you. If you want to see an example of what this looks like (because I did and couldn't find a good one), look at the feed I've set up for my blog. You'll see a lot of XML appear, this is the feed. People will be able to subscribe to this feed through an RSS reader of some sort. When you post a new blog post, you should update this feed, so people get notified. You can add as much or as little information in there as you want.
Build a mailing list to share your blog posts
As I've noted in the previous section, your readers won't be checking your website every day to see if there is a new post. Even if you have an RSS feed, people may not want to subscribe to it, or are unable to do so for some reason. Another way to notify people that you've posted something new is by sending them an e-mail.
I've done this through MailChimp. If you sign up for my mailing list, you'll be notified (max of 1 time per week) about the posts I've posted in the past week. This is all done automatically, because MailChimp can read my RSS feed and generate a newsletter for me. You can do this as well and here's how you do it:
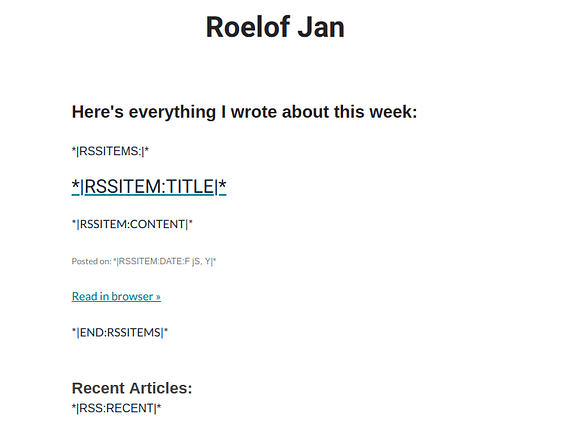
Follow this article to see what you need to do to set up an automated chain in Mailchimp: "Share Your Blog Posts with Mailchimp". When you get to the stage where you need to create a template, you might get confused about how to actually automatically get the article in your e-mail. Let me show you the template for my own e-mail:

This looks a bit weird, but these are called RSS merge tags. You can find many more if you Google a little bit. I'm posting this here because when I was setting this up, I had no clue what to do. There wasn't a great example out there.
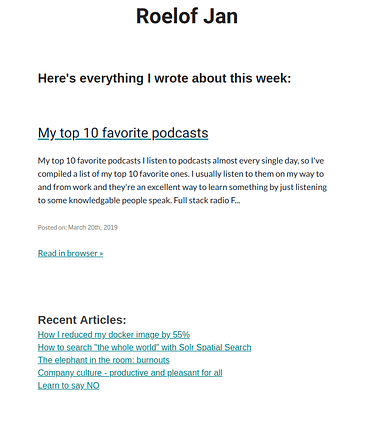
With those merge tags in place let's have Mailchimp generate a preview of the e-mail we'll be sending to our subscribers:

This is the e-mail Mailchimp automatically generated for us. This is my newest blog post (at the time of writing) and it's the only blog post in that week. If there were more published posts for the past week, it'll show all of them in this e-mail. As you can see, the *|RSS:RECENT|* tag has been replaced with links to my recent blog posts. So now I can notify anyone subscribed to my mailing list about any new blog posts, without having to do anything for it.
Share your blog posts on social media
After all of those automatic solutions, there is still a little bit of manual work to be done. After publishing your posts, you should share them on your social media channels. If you're really not into doing manual work, there are always ways to do this automatically but I prefer doing this manually. Of course, you'll need to pick your platform and audience. If you have a lot of friends on Facebook, but none of them are likely to see any benefit of reading your blog post, perhaps Facebook isn't the right place to share your blog posts. For this reason, I only share my posts on Twitter and LinkedIn. This is where I find my target audience (my peers, developers, business people, etc.).
But if you're completely clueless whether people are reading your posts on the different social media channels, share it on there and see what happens. You have Google Analytics enabled on your website, so you'll be able to see where your visitors are coming from. Perhaps you find a new platform that really loves to read your posts this way!
Do you have any other steps you feel I need to include in this post? Let me know on Twitter! I'm still learning new things about this process every day, so any new insights are appreciated. If you want to be notified when I publish new posts, subscribe to my mailing list or to my RSS feed!
Posted on: March 21st, 2019I streamline your business with software that actually fits the way you work.
Ready to streamline your business? Let’s chat.
