
Tutorial: How to set up and automatically deploy your website to GitHub Pages
So you want to host your static website on GitHub Pages? Excellent choice! In this tutorial, I'm taking you through the steps to host your static website on GitHub Pages and how you can deploy your own changes. After this tutorial, you will be able to automatically deploy your own website to the internet. Before we get into the steps you have to take to publish your website to GitHub Pages, I will outline a few options and limitations you have when using GitHub Pages for your website hosting.
What are my options for hosting a static website?
There are a few options you have for hosting your website on GitHub Pages, these include:
- Using Jekyll to generate your website
- Using your master branch as your source and production website
- Using your master branch as your source and gh-pages as your production website
In this post, I will not be going over how to use Jekyll in combination with GitHub pages. Jekyll is supported by GitHub, which means GitHub will do everything needed to deploy a Jekyll website for you. In this tutorial, we'll focus on deploying a plain HTML / CSS / JavaScript website.
The second option is to use the master branch both as the source of your website and the production website itself. What this means is that all of your source files, including build scripts, package.json file, and other "source" files like SCSS are accessible through the internet. For example, you'd be able to see the contents of your SCSS files by going to https://yourwebsite.com/scss/_header.scss. This is the easiest solution for hosting your website on GitHub Pages, but it's not the cleanest option.
This is where the third option comes in: using your master branch for all your source files and having a separate "gh-pages" branch that holds the production files for your website. This is a slightly more involved solution but is much cleaner than the second option. This is what this tutorial will focus on.
What are the limitations of hosting on GitHub Pages?
Hosting on GitHub Pages is great, but there are some limitations and gotchas. These include:
- You can only host static websites (or dynamic through static JS files)
- Your repository is the source of truth, so your compiled JS / CSS files need to be in Git
GitHub Pages is essentially a service that gives you a folder on a server. A web server like Nginx is serving the files as-is. There is no scripting layer and you can't execute PHP files for example. If you want to have a dynamic website, you can still do this, but you'll need to do it through JavaScript. JavaScript files are static files, so the server will be able to serve those as they are. When the files have been served, it's possible to retrieve data from any external service you have at your disposal.
Another thing that seems a little backward, if you've worked with CI/CD systems before, is that all of your production files will need to be in Git. Normally you only have your source files in Git, because the CI/CD pipelines build the production files for you. With GitHub Pages, you could accomplish this by using GitHub Actions, but we'll keep this tutorial simple and not go over that.
Setting up your GitHub Pages environment
Enough talk, let's get our hands dirty and set up our GitHub Pages environment with all the automation you need to quickly deploy new changes to your website.
Step 1: Create / Update your GitHub repository to be public
GitHub Pages can be done on private repositories, but for this tutorial, we'll focus on using a public repository for your website. The only difference between using private and public repositories for this is that you need to have a pro membership in order to use private repositories. If you already have this, you can skip to step 2 and follow along from there.
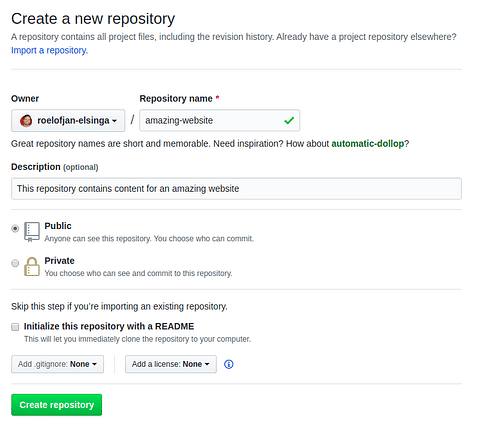
If this will be a new project for you and you still need to create a repository for your website, make sure to select the public option like displayed below:
If you already have a repository, but it's a private repository, you can make it public by clicking "Settings" and scrolling down to the danger zone:
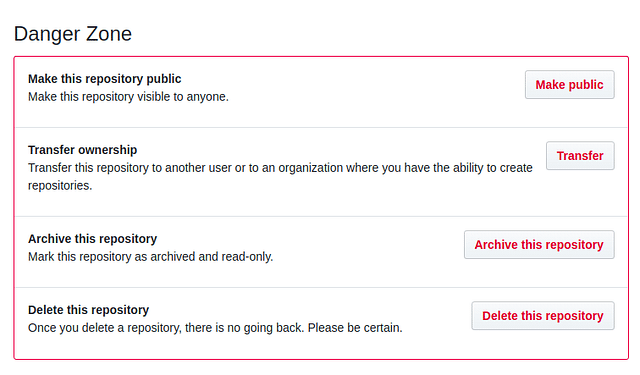
Click on "Make public" and you're ready for the next step.
Step 2: Create a website on your master branch
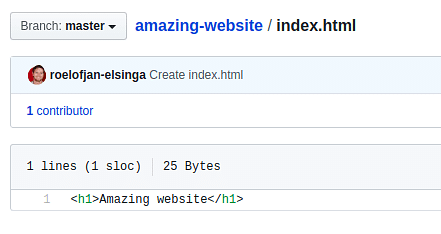
This is a step that's completely up to you. The aim of this step is to create some kind of content that can be displayed in the browser. You can make an entire static website or just create something simple and move on to the next step. For the sake of simplicity, I will only add an H1 to my project:
Step 3: Enable GitHub Pages on your repository
Before we enable GitHub Pages on this repository, you have to make a choice about which option you want to use for hosting your website on GitHub Pages. For the sake of this tutorial, I will use the third option: Using "master" as the source branch and "gh-pages" as the production version of the website.
To create the "gh-pages" branch, click on "Branch: master" and type gh-pages like below:
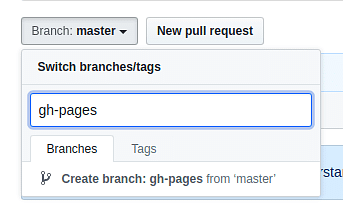
Then press: "Create branch: gh-pages from master". You will now have two branches in your repository: master and gh-pages. To enable GitHub Pages on your repository, click on "Settings" and scroll down the "GitHub Pages" section. You should see something like this:
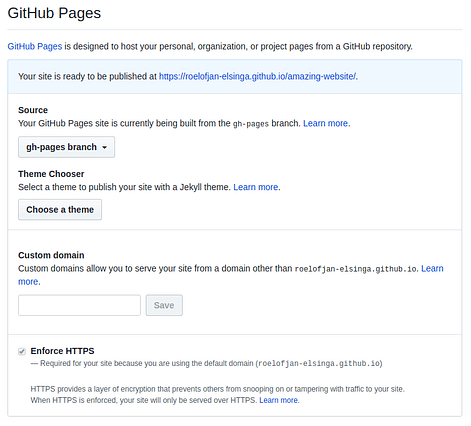
As you can see, GitHub has already enabled this repository for GitHub Pages, because it detected the "gh-pages" branch. If you chose to stick with the master branch, you will have to enable GitHub pages here and select the master branch as the source.
Now when we visit the url displayed in the blue header, you will see your website:

Step 4: Using a custom domain
Your website is now located at https://your-username.github.io/repository-name. But oftentimes you want your website to be at a domain you already own. To do this, first, you'll need to decide which type of URL you want to use for this. You can choose a main (apex) domain or a subdomain for this.
Step 4A: Using the main domain as your custom domain
If you want to use the main domain (roelofjanelsinga.com) then you'll need to create a few new DNS records in the service where you manage your domains. This is what my DNS records look like:

All you need to do here is create 4 A-records for your main domain and point them to the IP addresses below:
185.199.108.153
185.199.109.153
185.199.110.153
185.199.111.153
You can set the TTL to whatever you like, in my case I set them to 1 hour.
Step 4B: Using a subdomain as your custom domain
Using a subdomain is much easier than using the main domain as your custom domain. You will still need to change your DNS records, but this time you'll only need to do this:

You create a CNAME-record for the subdomain you want to use, for example, amazing.yourwebsite.com. Set the TTL to whatever you want, I use 1 hour for this. Then the content of your CNAME should be your-github-username.github.io, in my case roelofjan-elsinga.github.io.
Step 4C: Submitting your custom domain to GitHub
Now that you've set up your DNS records, you can submit your custom domain to GitHub. In the "Custom domain" field you can now enter whichever main domain or subdomain you chose and press "Save". A new file called "CNAME" will now appear in your repository. This will contain the domain you chose.
When using a custom domain, you might have to re-enable "Enforce HTTPS" for your website. It might take a while before this option becomes available because GitHub will verify your DNS settings. It might still give you warnings that your DNS settings are incorrect, but you can ignore these warnings if you followed the previous steps. This will automatically go away as soon as GitHub sees your updated DNS records. After a little while, you will be able to see your website appear on the domain you've chosen.
If you've already set up build scripts and your workflow is to your liking, this could be the last step you need to follow in this tutorial. Step 5 and 6 are about automating your build process and your deployments. These are nice to have, but they're not necessary to use GitHub Pages in any way.
Step 5: Automate your build process
If your deployment process becomes more difficult by using GitHub Pages, there is really no reason you should do it. This is why I'm including some scripts that you can use to automate your build and deployment processes. I make the following assumptions for these steps, as I can't cover every scenario out there:
- You're using a build command (gulp build, npm run build, etc.) to compile production assets
- Your production branch is gh-pages and your source branch is master
- You're using a "dist" folder that contains all production assets after running your build command
I'm more than happy to help you out if your situation is different than the assumptions I'm making here, just contact me on Twitter and I'll help you out with this step.
To be able to make everything automatic, I'm going to include an NPM package called Husky. Husky is a tool for NPM that enables you to define git hooks right inside of your package.json file. Git hooks are essentially events that are triggered when you interact with Git. For example, when you commit a change, the events pre-commit and post-commit are emitted. Husky allows us to listen for those events and perform certain tasks. For this tutorial we only need pre-commit, so let's set that up. First, let's install husky:
npm install --save-dev husky
# OR
yarn add -D husky
Now, in our package.json file, include the following configuration:
{
    // Scripts, dependencies, etc.
    "husky": {
        "hooks": {
          "pre-commit": "npm run prod"
        }
    }
}
Now, every time we commit a change in Git, "npm run prod" will be executed. You can replace this with your own build script, for example: "gulp build" or "webpack". In the case of my simplistic project, this could mean that we copy the index.html file to dist/index.html.
One last thing that we need to do is add new scripts to your package.json:
{
    // dependencies, etc.
    "scripts": {
        "prod": "echo \"Add your build command here\"",
        "postinstall": "node ./node_modules/husky/lib/installer/bin install",
        "deploy": "git push origin `git subtree split --prefix dist master`:gh-pages --force"
    }
    // husky, etc.
}
The "postinstall" script executes after you run "npm install". This makes sure that husky runs properly. I recommend you run "npm run postinstall" to be certain that husky has done what it needs to do. The deploy command will be needed in the next step, so just copy and paste it for now.
Now our code will be built every time we commit a change, without having to think about it. Just how we like it.
Step 6: Automate your deployment process
We've already automated the build process, so now we can automate the deployment process. For this, we're going to make use of GitHub Actions. This sounds very intimidating, but I'll explain exactly what's going on and I'll give you the configuration you need for this to work.
First of all, let's click "Actions" in your repository:
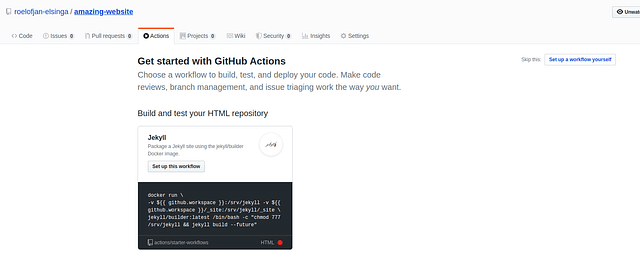
Then click on "Set up a workflow yourself" on the right side. In the new screen, you can write your configuration, but you can remove everything that's there and paste this instead:
# This script deploys your website automatically
name: CI

# Only trigger this script when you push to the master branch
on:
  push:
    branches: [ master ]

# Specify the tasks to run when this script gets triggered
jobs:
  build:
    runs-on: ubuntu-latest

    # Download our master branch
    steps:
    - uses: actions/checkout@v2

    # Run our deployment command
    - name: Deploying the static website to gh-pages
      run: npm run deploy
This configuration takes care of deploying your website automatically when you push changes to the master branch. All the way at the bottom you can see that we execute "npm run deploy". This is the script that we added to our package.json in step 5. When you run "npm run deploy", the following command will get executed:
git push origin `git subtree split --prefix dist master`:gh-pages --forceLet's analyze what this actually does. This command pushes a single folder, in this case "dist", to the gh-pages branch. That is the branch that we chose as our production branch in GitHub. This command will get executed every time we push to the master branch. Now every time you push your changes, GitHub Actions will automatically publish your "dist" folder. So that's another thing you don't have to think about anymore when deploying to GitHub Pages.
Conclusion
I hope this helps you to start deploying your own static websites to GitHub Pages and feel more empowered to update your own content, without needing the help of complicated deployment systems or a development team. Deployment of static websites really doesn't need to be complicated or take any extra work. Through automation scripts, you can deploy changes by going through your normal workflow, just like you've been doing.
If you want to see an example of a website that's currently running in production in the way that I've described in this tutorial, you can have a look at sandervolbeda/personal-website on GitHub.
Posted on: April 22nd, 2020I streamline your business with software that actually fits the way you work.
Ready to streamline your business? Let’s chat.
